How to Create a Segmented NSToolbarItem like Apple Mail.app
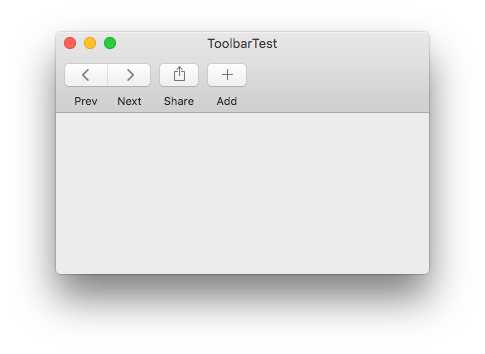
Ever wondered how Apple Mail’s NSToolbar achieves the effect of individually labeled buttons shown in groups?
Update 2018-11-23: I discovered a flaw in the target–action-mechanism of NSToolbarItems. They don’t fire if the label is hidden. This post’s approach is still valid enough, but is now part of a series of posts on the topic, with the 3rd one providing a fix:
- Original Approach (this post)
- Enabling/Disabling Segments
- Fixing an action dispatching bug when you hide toolbar icon labels
- Fixing action dispatching within overflow menus

If you know your AppKit, you’ll try to drag a NSSegmentedControl into the toolbar and fiddle around with it. But there’ll only be one label for the entire NSSegmentedControl.
The solution is simple but weird: there’s a NSToolbarItem subclass called NSToolbarItemGroup which can group a collection of NSToolbarItems so they can be moved around together only. In combination with a NSSegmentedControl you can label each segment individually.
You have to get out of Interface Builder for this and customize your NSToolbarDelegate to return a NSToolbarItemGroup instance:
let group = NSToolbarItemGroup(itemIdentifier: "NavigationToolbarItems")

// First add subitems
let itemA = NSToolbarItem(itemIdentifier: "PrevToolbarItem")
itemA.label = "Prev"

let itemB = NSToolbarItem(itemIdentifier: "NextToolbarItem")
itemB.label = "Next"

group.subitems = [itemA, itemB]

// ... then add a custom `view`
let segmented = NSSegmentedControl()
group.view = segmented
The weird thing about this is that you add both one subitem for each segment and the NSSegmentedControl as the group’s own view.
The segment labels will be obtained from the NSToolbarItems. Don’t set a label for the segments themselves (via NSSegmentedControl.setLabel(_:, forSegment:)) – these will be drawn inside the controls.
Fully Working Sample App
- Create a new OS X/Cocoa project
- Paste the following code into
AppDelegate.swift - There is no step 3
Update 2018-01-12: Thanks to Michael Gubik for a Swift 4 update! Swift 4 replaced lots of String-based identifiers with types, like NSToolbar.Identifier. This, in turn, makes my initial toolbarItems Dictionary require you to unwrap a ton of optionals. Instead, I suggest you try to run the code as a demonstration and then change your app to use a custom type for the configuration, too, like:
struct ToolbarItemConfiguration {
    let title: String
    let iconName: NSImage.Name
    let identifier: NSToolbarItem.Identifier
}
Now back to the sample code itself:
import Cocoa

@NSApplicationMain
class AppDelegate: NSObject, NSApplicationDelegate, NSToolbarDelegate {

    @IBOutlet weak var window: NSWindow!

    var toolbar: NSToolbar!

    let toolbarItems: [[String: String]] = [
        ["title": "irrelevant :)", "icon": "", "identifier": "NavigationGroupToolbarItem"],
        ["title": "Share", "icon": NSImage.Name.shareTemplate.rawValue, "identifier": "ShareToolbarItem"],
        ["title": "Add", "icon": NSImage.Name.addTemplate.rawValue, "identifier": "AddToolbarItem"]
    ]

    var toolbarTabsIdentifiers: [NSToolbarItem.Identifier] {
        return toolbarItems
            .flatMap { $0["identifier"] }
            .map{ NSToolbarItem.Identifier(rawValue: $0) }
    }

    func applicationDidFinishLaunching(_ notification: Notification) {
        toolbar = NSToolbar(identifier: NSToolbar.Identifier(rawValue: "TheToolbarIdentifier"))
        toolbar.allowsUserCustomization = true
        toolbar.delegate = self
        self.window?.toolbar = toolbar
    }

    func toolbar(_ toolbar: NSToolbar, itemForItemIdentifier itemIdentifier: NSToolbarItem.Identifier, willBeInsertedIntoToolbar flag: Bool) -> NSToolbarItem? {

        guard let infoDictionary: [String : String] = toolbarItems.filter({ $0["identifier"] == itemIdentifier.rawValue }).first
            else { return nil }

        let toolbarItem: NSToolbarItem

        if itemIdentifier.rawValue == "NavigationGroupToolbarItem" {

            let group = NSToolbarItemGroup(itemIdentifier: itemIdentifier)

            let itemA = NSToolbarItem(itemIdentifier: NSToolbarItem.Identifier(rawValue: "PrevToolbarItem"))
            itemA.label = "Prev"
            let itemB = NSToolbarItem(itemIdentifier: NSToolbarItem.Identifier(rawValue: "NextToolbarItem"))
            itemB.label = "Next"

            let segmented = NSSegmentedControl(frame: NSRect(x: 0, y: 0, width: 85, height: 40))
            segmented.segmentStyle = .texturedRounded
            segmented.trackingMode = .momentary
            segmented.segmentCount = 2
            // Don't set a label: these would appear inside the button
            segmented.setImage(NSImage(named: .goLeftTemplate)!, forSegment: 0)
            segmented.setWidth(40, forSegment: 0)
            segmented.setImage(NSImage(named: .goRightTemplate)!, forSegment: 1)
            segmented.setWidth(40, forSegment: 1)

            // `group.label` would overwrite segment labels
            group.paletteLabel = "Navigation"
            group.subitems = [itemA, itemB]
            group.view = segmented

            toolbarItem = group
        } else {
            toolbarItem = NSToolbarItem(itemIdentifier: itemIdentifier)
            toolbarItem.label = infoDictionary["title"]!

            let iconImage = NSImage(named: NSImage.Name(rawValue: infoDictionary["icon"]!))
            let button = NSButton(frame: NSRect(x: 0, y: 0, width: 40, height: 40))
            button.title = ""
            button.image = iconImage
            button.bezelStyle = .texturedRounded
            toolbarItem.view = button
        }

        return toolbarItem
    }

    func toolbarDefaultItemIdentifiers(_ toolbar: NSToolbar) -> [NSToolbarItem.Identifier] {
        return self.toolbarTabsIdentifiers;
    }

    func toolbarAllowedItemIdentifiers(_ toolbar: NSToolbar) -> [NSToolbarItem.Identifier] {
        return self.toolbarDefaultItemIdentifiers(toolbar)
    }

    func toolbarSelectableItemIdentifiers(_ toolbar: NSToolbar) -> [NSToolbarItem.Identifier] {
        return self.toolbarDefaultItemIdentifiers(toolbar)
    }

    func toolbarWillAddItem(_ notification: Notification) {
        print("toolbarWillAddItem", (notification.userInfo?["item"] as? NSToolbarItem)?.itemIdentifier ?? "")
    }

    func toolbarDidRemoveItem(_ notification: Notification) {
        print("toolbarDidRemoveItem", (notification.userInfo?["item"] as? NSToolbarItem)?.itemIdentifier ?? "")
    }

}
Update 2016-06-16: Enabling/disabling segments in the toolbar takes a bit of extra work. In short, you have to both disable the segment through the NSSegmentedControl and the corresponding NSToolbarItem. I wrote a follow-up post about disabling segments.
Update 2024-02-02: While the segmented control fires actions on behalf of its segments, the overflow menu uses a different mechanism. To hook into that, you need to assign an action to the NSToolbarItems themselves, too. These are copies over to the menu items in the overflow menu.