Switching iOS App Login Methods by Creating Your Own Simple Login Module
I really like the power of enums in Swift, so I was naturally inclined to see what the presentation “Simplifying Login with Swift Enums” by David East had to offer.
Here’s the setting: you’re going to offer multiple ways to authenticate users with your app. How do you model this?
As of late, it seems I’ve developed my own style to code in Swift. I suddenly don’t take in everything that is new as a cool new way to solve problems anymore but often stumble upon drawbacks and weird design decisions. I guess that’s a good sign. So here’s another way I think “cool stuff” can be improved even more.
The basic foundation looks well:
enum LoginProvider {
  case Facebook
  case Email
  case Google
  case Twitter
}
I guess the app starts with a list of login providers from which the user can select. David’s example app had a “facebook” button and an e-mail login form above that.
With four options in total, displaying all at once isn’t feasible. Better let users select from the options first. Let us keep that in mind.
David continues to talk about associated types, which indeed are very cool – but he ends up with this when he provided an example for e-mail based login:
enum LoginProvider {
  case Facebook
  case Email: (LoginUser)
  case Google
  case Twitter
}

struct LoginUser {
  let email: String
  let password: String

  func isValid() -> Bool {
    return email != "" && password != ""
  }
}

let loginUser = LoginUser(email: ..., password: ...)
let provider = LoginProvider.Email(loginUser)
This is possible with Swift and it’s super useful. But you end up with a similar problem like the one from the start: if LoginProvide.Email now requires an associated LoginUser, how will you change the state of the current selection of providers?
The LoginUser is created from a form that should be displayed after the user selects “e-mail”. This selection of authentication method has to be represented somehow. That’s what I thought the initial enum was for.
David’s presentation is short and the examples possibly end up a bit contrived. Here, I want to show design solutions that work and that you can adapt. Thus the question is: how can we build on top of that enum and make this actually work for us?
Modeling Login Methods as Enum Cases

Let’s say you have a list which displays all possible allowed login methods. You need a string representation of each for the view. And you want to avoid mistakes, so you use an enum to hard-code allowed values:
// Based on `String` for display purposes
enum LoginProvider: String {
  case Facebook // String value inferred by Swift automatically
  case Email
  case Google
  case Twitter
}
You can’t iterate over all cases, so you need a list of possible values:
extension LoginProvider {
  static func allProviders() -> [LoginProvider] {
    return [.Facebook, .Email, .Google, .Twitter]
  }
}
Say the user selects “Twitter”. I expect the result of this interaction to be that LoginProvider.Twitter is passed on to an object that is responsible for displaying the Twitter-based authentication.

Authentication in general is just a gatekeeper to the app’s real functionality. It can be thought of as a closed module which you invoke first to protect the app. Actually, this is much like copy protecting an app with license codes. The authentication method can differ, you can add or remove some, but the overall app won’t change. (Sounds like a good job for inheritance already, doesn’t it?)
Unlike David, we cannot associate other types with concrete LoginProviders because the job of this enum is to (1) help show all supported variants and, above all, (2) encapsulate the selection in a type-safe manner.
The selection of kind LoginProvider.Twitter is really just a more expressive way than calling delegate.loginViewController(self, didSelectMethod: "twitter") or similar. The enum is there to avoid bugs due to hard-coded primitive values like numbers and strings and expresses the selection in code.
The whole authentication process or module will need to:
- encapsulate the selection of a login provider
- encapsulate showing the forms for a picked provider
- query the servers and parse the results depending on the selection
- send an “unlock” message to the app to transition to the real functionality
According to David’s talk, some login mechanisms will use two async queries, others will work totally different. That’s why the whole process needs to be variable and be contained in the concrete authentication variant.
What will TwitterAuthentication and EmailAuthentication have in common?
- The authentication process can be started
- and succeed
- or fail.
Since the failure case can be handled by the concrete authentication method (retry, display error, etc.), only the success case and its “unlock” message are interesting to the outside world. I suggest using blocks instead of explicit delegate methods:
protocol Authentication {
    // could as well send a NSNotification to decrease coupling further
    var unlockAppHandler: () -> Void

    /// Display authentication details in a modal scene
    func startAuthenticating()
}
I think startAuthenticating will work best when presented modally with its own UINavigationController: modal scenes usually cancel, and that fits the interaction better than going back.
Note I didn’t include an authentication failure handler because failure is recoverable by the concrete authentication process – no need to propagate the failure to the locked app. Given a modal display of the unlocking scene, when the user gives up, she will cancel the authentication process, dismiss the modal and nothing will have changed to the app itself.
David’s code samples featured switch-case statements. As a rule of thumb, try to avoid conditionals like that as much as you can and delegate to concrete subtypes of a shared supertype or protocol. You’re doing object-oriented programming, so use objects. A method like the following encapsulates the connection in one central place. That’s always better than scattering conditions for LoginProvider all over your app.
extension LoginProvider {
    static func authenticationForProvider(loginProvider: LoginProvider,
        unlockAppHandler: () -> Void) -> Authentication {

        let authentication: Authentication

        switch loginProvider {
        case .Twitter: authentication = TwitterAuthentication()
        case .Email: authentication = EmailAuthentication()
        // ...
        }

        authentication.unlockAppHandler = unlockAppHandler

        return authentication
    }
}
Now there’s a single point in your app where knowledge about which login provider results in which process is encapsulated. The concrete authenticators can now differ tremendously without cluttering your code. It’s clear where truth is. Nothing’s shared except the protocol.
Compare that to a button touch handler @IBAction func login() where each of the LoginProvider cases is handled differently in that method. And the view controller having to display different fields for each provider. The variance of providers would be scattered all over the place.
Discovering Behavior in Enums
Right now, we’d be obtaining a concrete Authentication for the selected LoginProvider and work with that. Thinking in terms of objects instead of data structures, it’d be cool if we could initiate to authenticate the user with the LoginProvider directly since it should provide means to login, after all, not just represent them.

Enums are first-class citizens in Swift. They are real objects which can have real behavior. They just don’t have (mutable) state, unlike structs.
The authenticationForProvider method from above implicitly associates LoginProvider cases with concrete Authentication implementations. We should be making this connection even more explicit. Not through associated objects (because then we’d have to know them before obtaining LoginProvider cases again) but through behavior on this special kind of value type.
Modifying the existing stuff and getting rid of the static factory method, we can merge the Authentication protocol with LoginProvider:
enum LoginProvider {
  case Facebook
  case Email
  case Google
  case Twitter

  var displayName: String { ... }
}

protocol Authentication {
    var unlockAppHandler: () -> Void  // could as well send a NSNotification

    /// Display authentication details in a modal scene
    func startAuthenticating()
}

class TwitterAuthentication: Authentication { ... }
class EmailAuthentication: Authentication { ... }

extension LoginProvider {

    var authentication: Authentication {

        switch loginProvider {
        case .Twitter: return TwitterAuthentication()
        case .Email: return EmailAuthentication()
        // ...
        }
    }

    func authenticate(unlockAppHandler: () -> Void) {

        let authentication = self.authentication
        authentication.unlockAppHandler = unlockAppHandler
        authentication.startAuthenticating()
    }
}
Benefits of this Approach
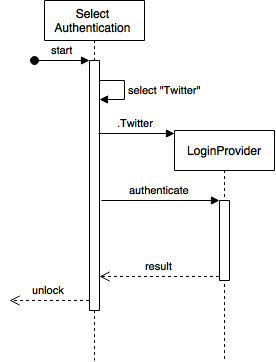
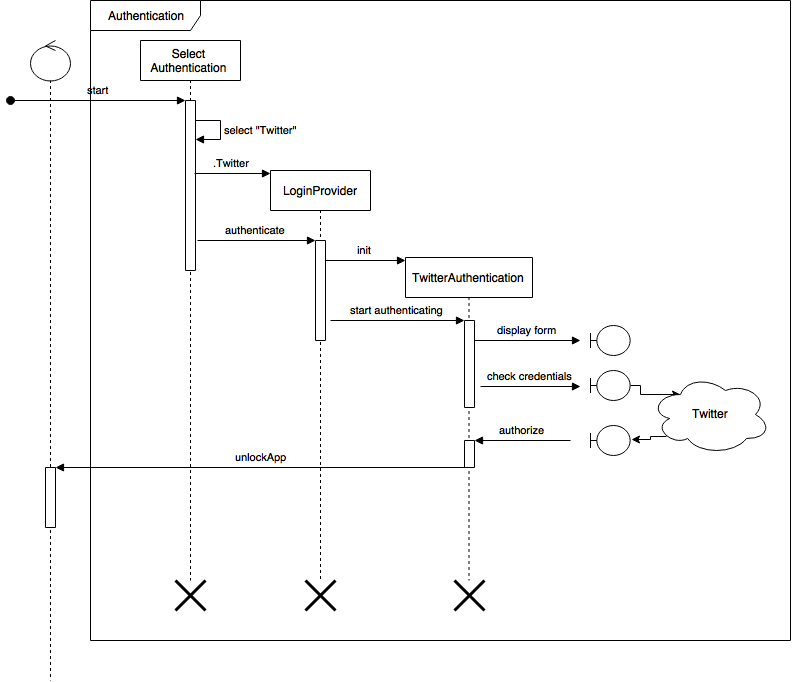
Thus we end up with a behavior-rich model to authenticate users. The following diagram should represent how this works and show the encapsulation through module boundaries nicely.

Encapsulating authentication in a module with a single point of entry and a simple callback upon success makes it easy to maintain the hosting app. Also, you could reuse the authentication module in other apps easily since it’s not entangled in all of your app’s code.
The sketched implementation from above has a caveat: the concrete Authentication object is created in LoginProvider.authenticate(_:). That’s the only strong place where a strong reference to it is held. This will work nicely if startAuthenticating() blocks the current thread. Taking async authorization into account, this is unlikely, though.
So we need another place to keep a strong reference.
A cheap way out is to create a service object to encapsulate the action:
class Authenticate {
    let loginProvider: LoginProvider
    let authentication: Authentication

    init(loginProvider: LoginProvider) {

        self.loginProvider = loginProvider
        self.authentication = loginProvider.authentication
    }

    func authenticate(unlockAppHandler: () -> Void) {

        authentication.unlockAppHandler = unlockAppHandler
        authentication.startAuthentication()
    }
}
There’d be one active Authenticate instance per module; when the user switches methods, a new Authenticate command instance is created.
Of course a boundary object of the module could do the same and mutate its own state. But I prefer to split this apart to keep variation and implicit coupling between values to a minimum.